An Over-Engineered Travel Blog

Most people would just have a pin board to hang on the wall and track their travels by adding new pins for each trip; I have a custom ReactJS component which plots trips from a set of JSON files acting as a sort of database.
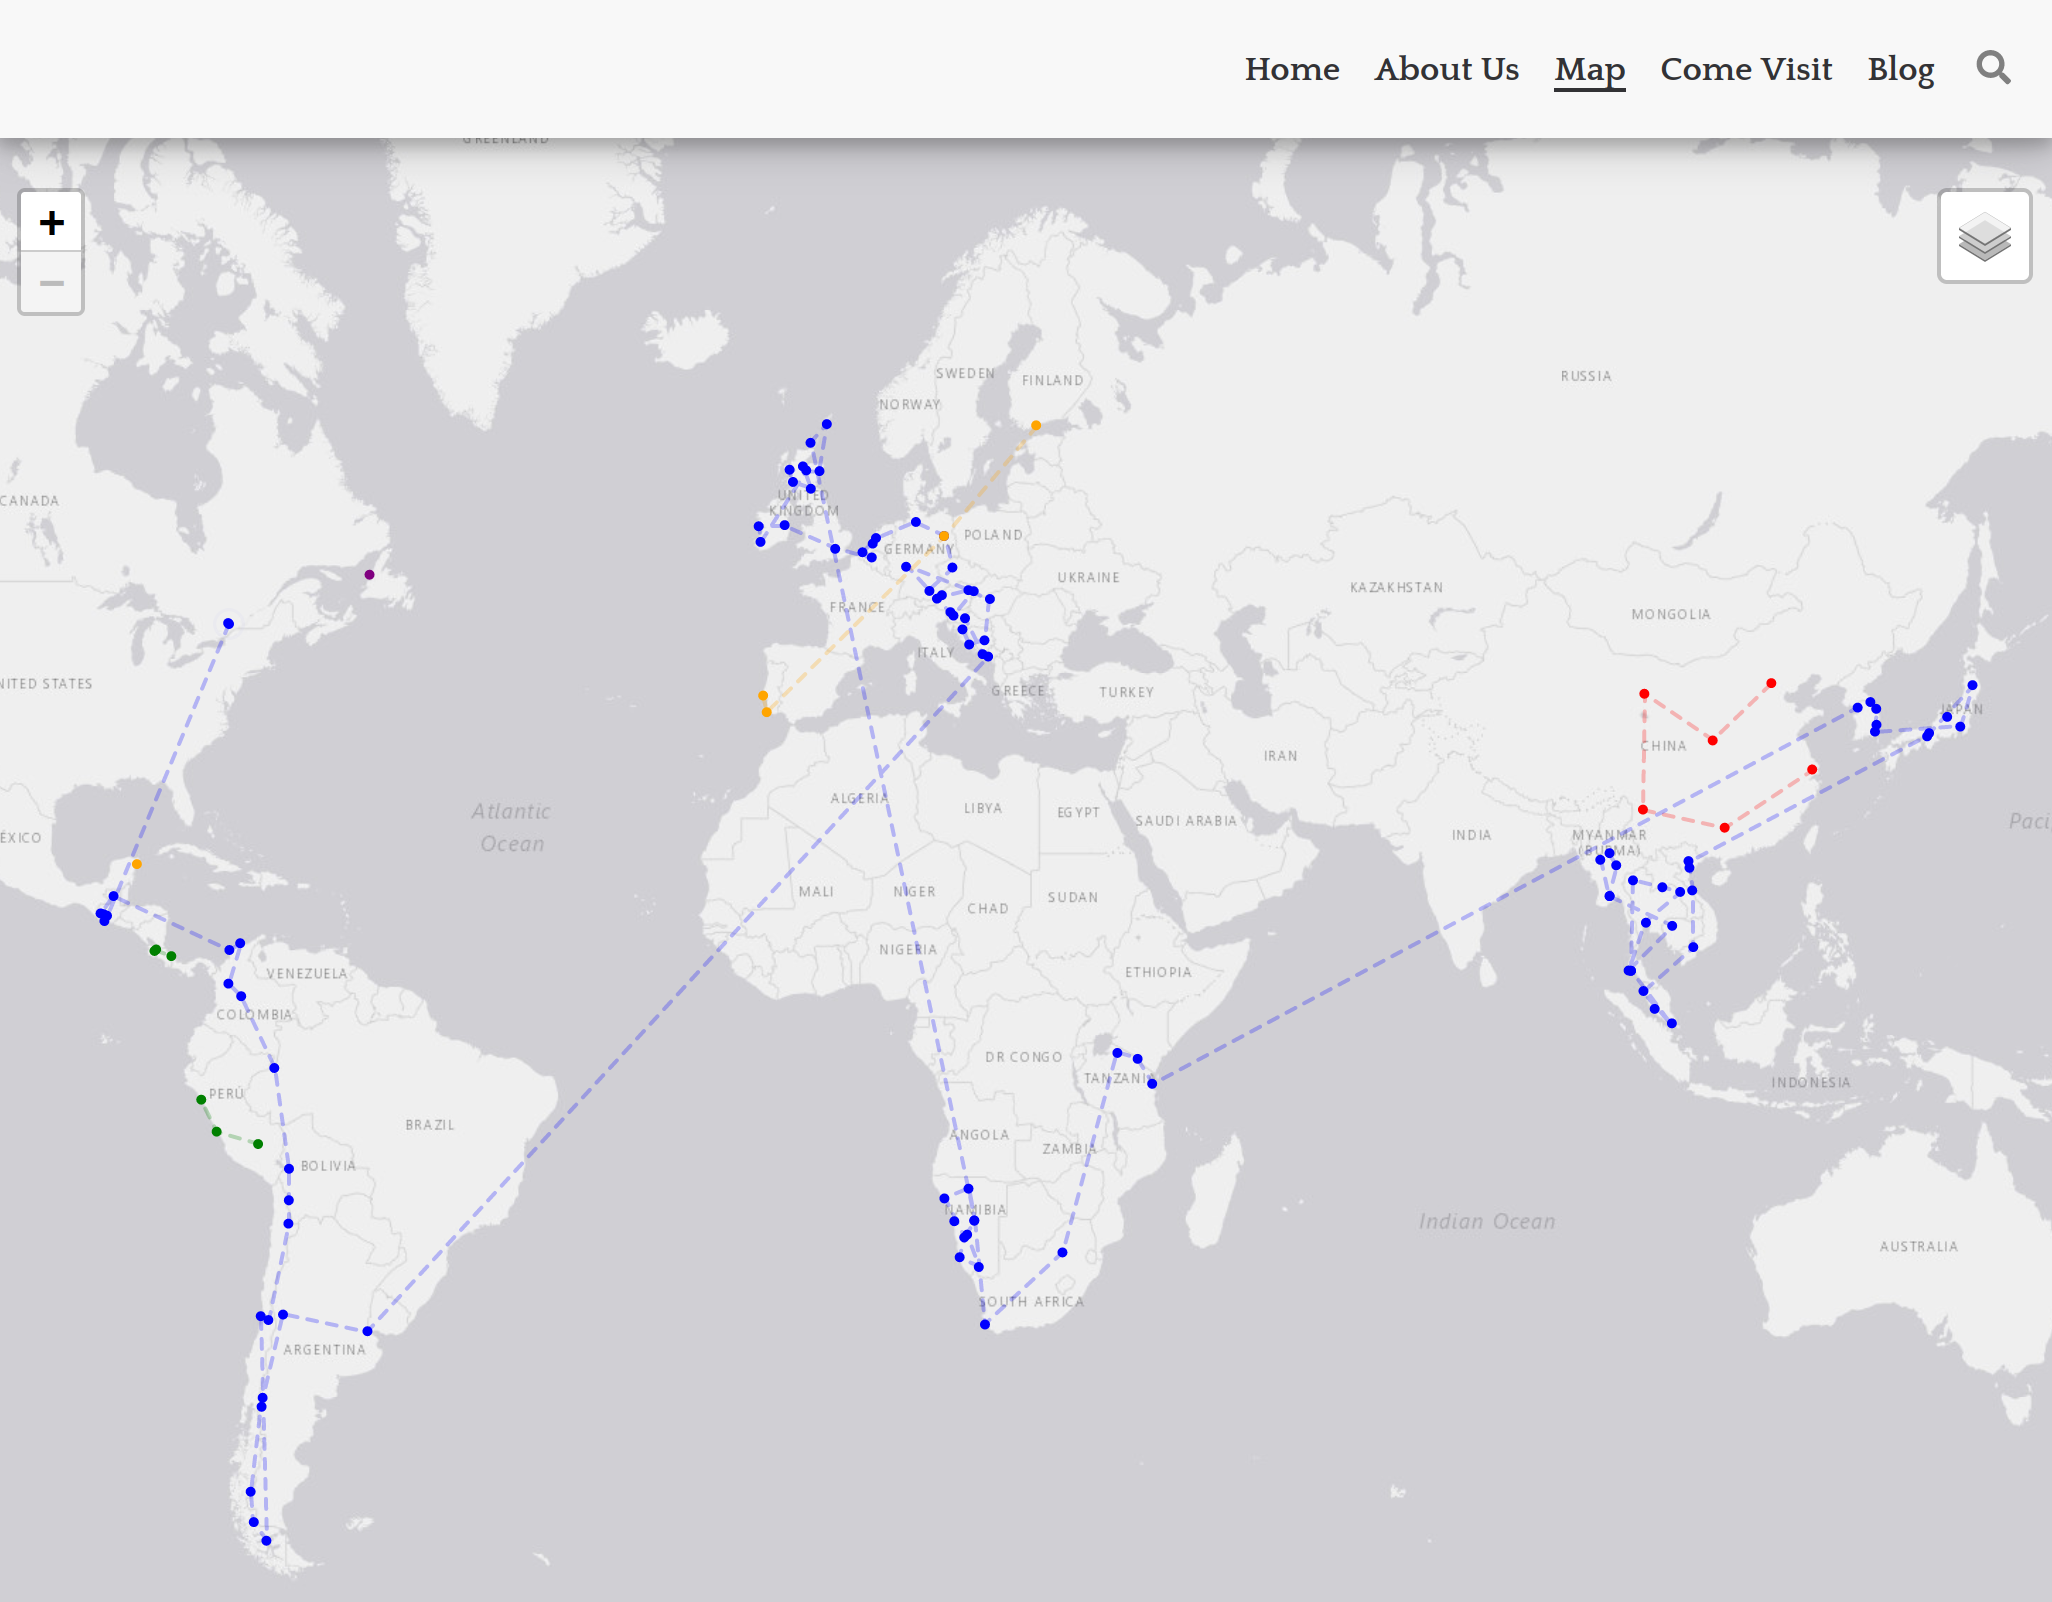
map
The locations on the map are clickable for more details like the place and date. In the top right there is a layer control I recently added to toggle on and off different datasets like Sam's and my childhood trips.

I created kevinandsam.travel back in 2018 when my partner and I quit our jobs to follow our dream of backpacking around the world. We traveled to 31 countries across 4 continents over the course of 14 months - the experience of a lifetime. I often worked on the site among other projects along with some consulting work in the downtime between destinations. I loved being a nomad but I also realized that too much work can detract from the true purpose of long-term travel and I would encourage anyone considering this lifestyle to save up more and work less.

The site is built with GatsbyJS. I’d used a couple of static site tools in the past (Middleman and Jekyll for this blog) and I wanted to try something new this time. Gatsby caught my attention because of how it combines React, server side rendering, rehydration and preloading for subsequent page navigation. This blog achieves a similar result using Turbolinks on top of Jekyll but it is cool to see this functionality as part of the framework.

The framework delivered great performance which is best illustrated through a typical user visit:

  1. The first page loads a completely server rendered HTML page with inlined CSS and an initial JS bundle. For kevinandsam.travel the home page is 16kb of HTML and ~100kb of Javascript. Thanks to rehydration the app behaves like a React app going forwards.
  2. Hovering over the “Map” link in the nav bar preloads 3 more Javascript files and a page data JSON file. These files total ~60kb and include the additional Javascript required for the Map. If we inspect the files we can see most of the size is coming from leaflet.
  3. For comparison if we hover over “About Us” only two Javascript files totalling ~10kb are preloaded.
  4. When a link is clicked the navigation to the new page is quick and smooth because the data and code has been pre-fetched.

More important than the measured performance the site feels fast thanks to smart animation of the content. Anecdotally it is fast everywhere in the world - at least everywhere I’ve tried :wink:.

Another reason I picked Gatsby is React itself. I had a few features in mind for the site which I knew would be easier to build using open source components. In my opinion, this is one of the main benefits of React, especially for solo projects or small teams, it is so much better and easier to grab off the shelf UI pieces and integrate them than in the old jquery days. One of these features is the Come Visit form which has a country dropdown and a datepicker powered by the same data that draws the map.
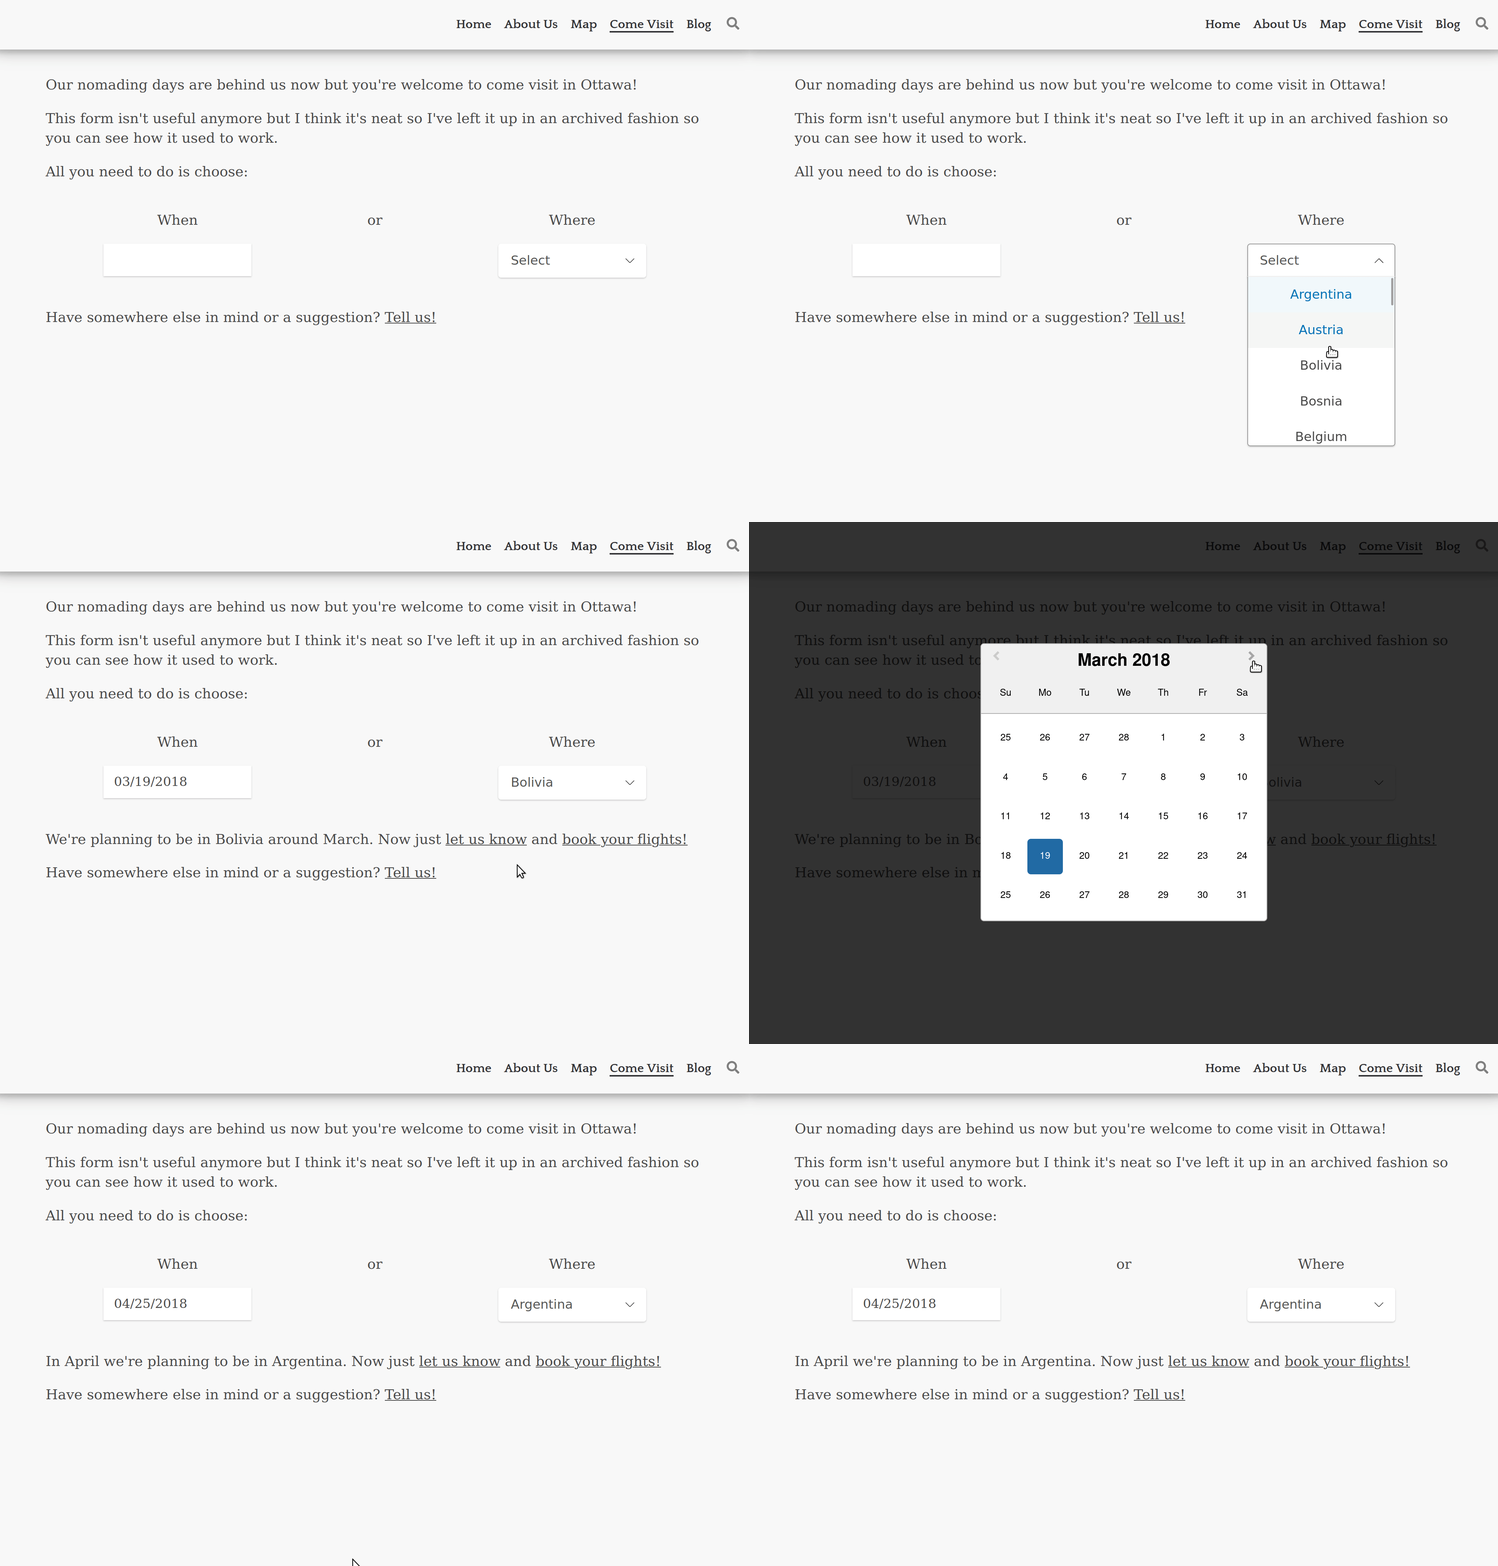
visit
The conversational response that fades in after making a selection has links to send an email with a pre-filled subject and to Google flights with the destination airport pre-filled. It used to set the dates too but Google doesn't accept dates in the past so it doesn't anymore.

Having our route data in a structured JSON format was also useful for planning while we were travelling. I had a few scripts I used to quickly convert dates into durations at each location. It was often much easier to think in terms of how many days we wanted to spend somewhere than in dates. This script enabled an iterative workflow where I could print the durations while tweaking dates and see where everything landed. This was also useful to arrange meeting people in certain places and times as well as managing seasonal constraints.

Another nice feature of Gatsby is the image plugins. The site is very image heavy and the framework handles pre-processing and resizing of images at build time which makes it easier to manage assets. I can commit the full size images and then resize appropriately during the build but crucially it is easy to change the size at any time. Gatsby also automatically creates inlined placeholders for images while they load for a nice effect.

Later in the development, I added custom markdown components with rehype (and even later migrated to MDX) which after a mildly painful setup made writing posts featuring advanced layouts and photo carousels a blast. Overall, I have been pretty happy with the framework - I got the result and performance I wanted but occasionally I did have to fight with confusing build errors.

The newest addition to the blog is a re-presentation of our social media posts from our trip. While I have mixed feelings about social media, I value the content we shared about our journey and the connections it facilitated. To reduce my dependence on these platforms I decided to preserve the posts that matter to me on my own blog. This way I can maintain control over the content and have one less reason to keep my accounts.

I started by exporting my data and rebuilding my Facebook feed. I’ve used a few of these export tools and I am always impressed with the data I receive back, it wasn’t a drop in but with a minimal python script I could easily filter and transform the data into something appropriate for a Gatsby source. The initial feed was pretty straight forward to build thanks to react-photo-album and Gatsbygram for an infinite scroll example. The toughest part was drawing a nice arc on the map for the “travelling to” posts. After getting my cloned feed working I was able to take things further and add functionality to search, filter and change the order.

facebook
I had to rig up a setTimeout and fiddle with some parameters to actually capture the loading spinner for this gif. The production parameters load more in advance and the user never sees the spinner for a very true infinite scroll experience.

Instagram was the harder of the two to build. I re-used quite a bit of the import logic and basic component setup but the modal I wanted required new state and logic. Getting the styling right and maximising the space used by the image in all possible aspect ratios was a challenge and took longer than I’d like to admit. I was able to leverage react-photo-album again along with react-responsive-carousel and an underlying library for swipe events to build a mobile and desktop friendly instagram-esque page on our site.
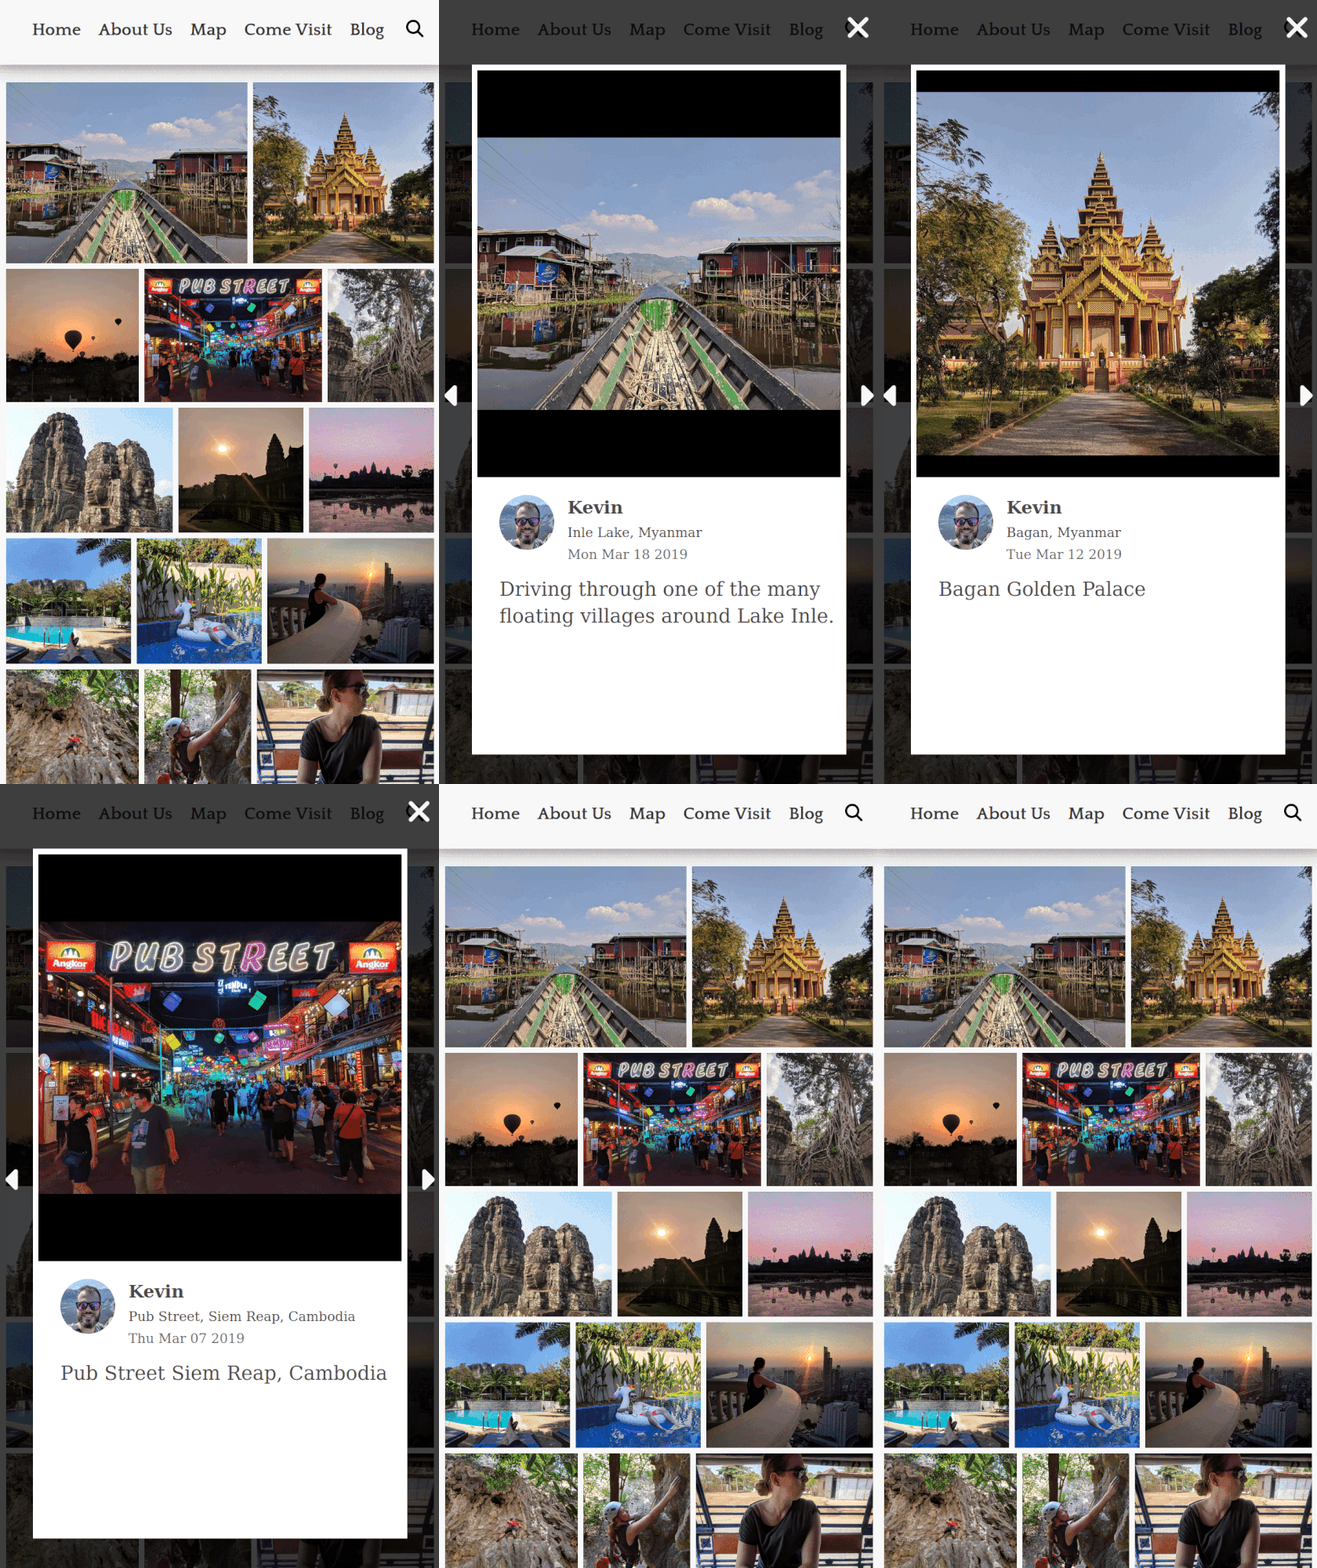
instagram

Afterwards, I generalized the infinite scroll pattern with a higher order component and added search to the original blog section of the site. Search could be further abstracted to remove some duplication present in each of the components but I am happy enough with the implementation for now.

I enjoyed revisiting these old posts and exploring my data in this way. It served as a fun but admittedly odd way to reminisce about our time travelling. The recent push to finish these features also motivated me to finally open source the site and share more about the process of building it. You can check out all the code on github at kevinhughes27/kevinandsam.travel; sometimes I even wrote PRs to myself :joy:.

If you made it all the way here thank you for reading, and I hope this post has inspired you to build for yourself, for fun, or simply because you can.

2016 a Year in Review

Looking back 2016 was another pretty crazy year. It’s now been 5 years since I finished my undergraduate degree which meant I returned to Queen’s for homecoming. It was great to see everyone and learn about what they’ve been up to. Queen’s must have done something right since everyone was doing really cool things.

My life advanced in a couple of pretty major ways: Sam, my girlfriend, moved in beginning what I jokingly refer to as the cohabitation. Shopify is continuing to grow at a rapid pace as is my role in the company becoming a Senior Developer. One of my goals for 2016 was to learn more about personal finance and I invested a fair amount of time reading and building spreadsheets. I now feel confident in understanding my savings and investments. I also got interested in politics this year with all the elections and became a more engaged citizen, this is something I plan to continue with in 2017.

Travel

I travelled less in 2016 only making it outside the country twice. I had the pleasure to attend Unite, Shopify’s first developer conference, in San Francisco and in the fall I visited Florence Italy for Ruby Day. I also went to Kitchener for Oktoberfest (the largest Oktoberfest outside of Munich) which felt like a real trip even though it was close to home. I’ve got big travel plans for 2017 which is partly why this year was more reserved ✈️

Sports

I started rock climbing and snowshoeing as part time sports this year which added some nice variety. Training wise I’ve moved away from power lifting and started doing kettlebells and more asymmetrical weight training. I feel more solid with this new training style so I plan to keep it up for 2017.

I caught my first Callahan ever this ultimate season (intercepting for a point) and later on got my second. I co-captained Swift (Ottawa’s open development team) this year and started a new league team, Heist, which finished 10th overall in the league. In total I played in 6 tournaments including the world famous Gender Blender where we won the best campsite award (bascially means we won the party 🎉).

Side Projects

I spent most of this year in side projects working on my app for running Ultimate tournaments. Web side projects are a huge time sink because they are never done. I finally launched in the spring and had several users over the summer. It’s a pretty niche market so I’m happy with things so far. I’m working several updates based on initial feedback and then I plan to start advertising the product again.

I’m really not kidding when I say the 2 main things in my life are code and Ultimate - it got even more blurred with my second big project of the year. I worked on a re-do of the Parity league software and learned some new tools like webpack, babel, eslint and flow along the way.

Lastly over the winter break I got back into AI programming and learned TensorFlow with my TensorKart project. I posted to Hacker News for the first time and managed to go semi-viral. The response has been incredible, TensorKart is still doing laps of the internet as more people discover, re-tweet or blog about it. I’ve even had some patches submitted to improve accuracy and cleanup dependencies.

Open Source

I made an effort to get back into contributing to open source this year. By contributing I mean submitting code to existing projects not releasing new ones. It takes a lot of effort to submit a high quality patch but I find it rewarding and worthwhile. I’ve found I learn a lot by going through the process of really understanding someone else’s design.

Here are some of my contributions this year:

  • My first Rails PR #27386 - documentation for building generators with command line arguments
  • OpenCV #7887 - fixed training program output for GPU based classifiers
  • Griddle #320 - added a detailed example of how to build a custom filter component
  • The new Shogun website was finally deployed

TensorKart: self-driving MarioKart with TensorFlow

This winter break, I decided to try and finish a project I started a few years ago: training an artificial neural network to play MarioKart 64. It had been a few years since I’d done any serious machine learning, and I wanted to try out some of the new hotness (aka TensorFlow) I’d been hearing about. The timing was right.

Project - use TensorFlow to train an agent that can play MarioKart 64.

Goal - I wanted to make the end-to-end process easy to understand and follow, since I find this is often missing from machine learning demos.

Finally, after playing way too much MarioKart and writing an emulator plugin in C, I managed to get some decent results.

Driving a new (untrained) section of the Royal Raceway:

RoyalRaceway.gif

Driving Luigi Raceway:

Getting to this point wasn’t easy and I’d like to share my process and what I learned along the way.

Training data

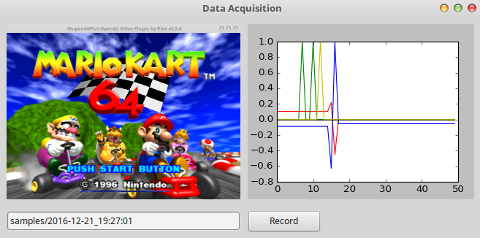
To create a training dataset, I wrote a program to take screenshots of my desktop synced with input from my Xbox controller. Then I ran an N64 emulator and positioned the window in the capture area. Using this program, I recorded a dataset about what my AI would see and what the appropriate action was.

record

This was the only part I finished back when I started this project. It was interesting to see the difference in my own coding style and tool choices from several years ago. My urge to update this code was strong, but if it ain’t broke don’t fix it. So other than a bit of clean up, I mostly left things as they were.

Model

I started by modifying the TensorFlow tutorial for a character recognizer using the MNIST dataset. I had to change the input and output layer sizes as well as the inner layers since my images were much larger than the 28x28 characters from MNIST. This was a bit tedious and I feel like TensorFlow could have been more helpful with these changes.

Later, I switched to use Nvidia’s Autopilot developed specifically for self-driving vehicles. This also simplified my data preparation code. Instead of converting to grayscale and flattening the image to a vector manually, this model took colour images directly.

Training

To train a TensorFlow model, you have to define a function for TensorFlow to optimize. In the MNIST tutorial, this function is the sum of incorrect classifications. Nvidia’s Autopilot uses the difference between the predicted and recorded steering angle. For my project, there are several important joystick outputs. The function I used was the euclidean distance between the predicted output vector and the recorded one.

One of TensorFlow’s best features is this explicit function definition. Higher level machine learning frameworks might abstract this, but TensorFlow forces the developer to think about what is happening and helps dispel the magic around machine learning.

Training was actually the easiest part of this project. TensorFlow has great documentation and there are plenty of tutorials and source code available.

Playing

With my model trained, I was ready to let it loose on MarioKart 64. But there was still a piece missing: how was I going to transfer output from my AI to the N64 emulator? The first thing I tried was to send input events using python-uinput. This almost worked and several joystick utilities believed my program was a proper joystick, but unfortunately not mupen64plus (the N64 emulator).

By this point, I was already digging into how mupen64plus-input-sdl worked (to see why it didn’t like my fake input), so it seemed like a better idea to write my own input plugin rather than trying to hack through multiple layers with fake joystick events.

Rabbit Hole - writing a mupen64plus input plugin

I hadn’t written a proper C program in quite a while, and I was excited to give it a go. I started by doing a curated copy paste of the original input driver. My goal was to get a bare bones plugin compiled and running inside the emulator. When the plugin is loaded, the emulator checks for several function definitions and errors if any are missing. This meant my plugin needed to have several empty functions defined. I thought this was interesting and pretty different from how I’m used to connecting things.

With my plugin working, I figured out how to set the controller output. I made Mario drive donuts forever.

donuts.gif

The next step was to ask a local server what the input should be. This required making an http request in C, which turned out to be quite the task. People complain that distributed systems are hard - and they are! - but they forget that it used to be pretty hard to distribute them in the first place. It took me a while to figure out that my http request was missing an extra newline (and was thus malformed), which caused my python server to hang and never respond since it was still waiting for the request to finish. After a few more interesting mishaps, I finally finished consuming data and outputting it to the N64 emulator internally.

My completed input plugin is available on GitHub.

Playing Revisited

Now my AI could play! The first race was pretty disappointing - Mario drove straight into the wall and made no attempt to turn :sob:.

To debug, I added a manual override, allowing me to take control from the AI when needed. I observed the output while playing and stepped through the whole system again. I came up with 2 things to fix for the next iteration:

  1. While re-inspecting my training data, I found that the screenshot was occasionally a picture of my desktop behind the emulator window. I didn’t bother looking into why this happened since I’d been down enough rabbit holes on this project already. My solution was simply to remove these bad samples from my data and move on.

  2. I noticed that MarioKart is a very jerky game in that you typically don’t take corners smoothly. Instead, players usually make several sharp adjustments throughout a large turn. If you think about what the agent sees at each iteration, this jerkiness could explain why Mario didn’t turn. Thanks to aliasing of the data, there would be images of Mario in the middle of a turn both with and without a joystick output indicating the turn. I suspect the model learned to never turn and that this actually resulted in the smallest error over the dataset. Training is still a dumb optimization problem and it will happily settle on this if the data leads it there.

    With this in mind I played more MarioKart to record new training data. I remember thinking to myself while trying to drive perfectly, “is this how parents feel when they’re driving with their children who are almost 16?”

With those 2 adjustments I got the results you saw at the beginning of this blog post. Hooray!

Final Thoughts

TensorFlow is super cool despite being a lower level abstraction than tools I used several years ago (scikit-learn and shogun). The speed it offers (thanks to cuDNN) is worth it and their gradient descent / optimizers seem really top notch. If I was doing another deep learning project, I probably wouldn’t use TensorFlow directly; I’d try keras since doing the math for layer sizes sucks (keras is built on TensorFlow though so it’s basically syntactic sugar).

In a couple of days over winter break, I was able to to train an AI to drive a virtual vehicle using the same technique Google uses for their self-driving cars. With approximately 20 minutes of training data, my AI was able to drive the majority of the simplest course, Luigi Raceway, and generalized to at least one section of an untrained racetrack. With more data, I bet we could build a complete AI for MarioKart 64.

Source code:

github.com/kevinhughes27/TensorKart

github.com/kevinhughes27/mupen64plus-input-bot

Update / Reception

This post went viral on the internet!

It started by topping hacker news: hacker news

It did pretty good on /r/programming as well. Then it got picked up by Google News, LinkedIn and all sorts of content sites. I personally got a kick out of it when Google suggested my own article to me 😂

Tensor Kart is still doing laps of the internet to this day thanks to various twitter bots.